


Beautiful, isn't it? It's probably the only thing this loud, big and orange that I can show appreciation for these days, really. And before we go into technicalities, let me clear one thing up - technically speaking, this is a Lego "Technic" kit, which means you won't find any of the traditional pieces that you'd find in, say a child's castle build kit, for example. Rather than 2x4 bricks and such, the Porsche kit featured beam-like elements that give way to much more flexibility when it comes to elements of realism and detail. In fact, the only things that actually featured any real "bricks" were the tail lights and the fog lamps up front. The rest thought was a mix of Technic pieces that proved to be tons of fun to put together. With that said, let's take you through the build summary:

The Box:
When you open most lego kits, you're usually greeted by an array of clear plastic bags filled with different lego elements, an instruction manual, some stickers - and that's really it. You don't tend to think of unboxing a Lego kit as an experience because, if you're like me, you're way too excited to get building. However, the unboxing of the Porsche kit proved to be just the opposite.
When I took off the cover, I was greeted by a series of black boxes, each one numbered from 1 to 4, along with what could be described as the most dense instruction manual I've ever come across in my experience with step-by-step builds. The designers of the Porsche kit really wanted the small details and realistic elements to be the true highlight of the build. They wanted everything about it to be an experience, starting with the first time you lift the box cover. They even had a special box specially designated for holding the Porsche's rims and tires. That was something I'd never seen before, and it only made me more excited to get cracking on the project.

I lifted the instruction manual - which was easily a 5 pound item itself - from the box, and had a look inside. The first few pages went through the story of how the Porsche 911 GT3-RS came to be. It was a prologue that highlighted the depths that Lego went through to be able to replicate the finest of details from the real 911 GT3-RS from which this build kit was based on. Things like the contours of the body, the drivetrain and engine, and even the complex double-clutch gearbox were among the details that Lego covered in the Years that this kit took to design. Flipping through this story showed early prototypes, highlighted the struggles and showed a true testimony to the amount of passion and dedication that the members of this project put forth to deliver the most realistic, detailed replica they could using Lego elements. It really gave me a true appreciation for the build that I was about to begin. This wasn't just another kit that you tore open and got to work on right away. This kit reminded me to really take my time and enjoy each step of the process. With that said, I opened Box 1, and got to work.
Early Impressions:
When I opened the first box of the nearly 3,000 piece kit and laid out each bag on the table in front of me, I was already appreciating the level of detail that I would be putting into the build before I'd even completed step one. At this stage, I hadn't been too sure what to expect since I hadn't even glanced at the instructions, but luckily, the instruction manual had a cover page and small prologue preceding each box. I learned, then that box 1 of 4 would be the chassis, engine and gearbox of the 911 - also the most detailed and most complex of the 4 boxes in the set.

As I set to work, assembling each piece, I felt that I'd gained a heightened sense of awareness and attention, because the more detail there was, the more prone I would find myself to making mistakes, and anyone who's ever tried their hand at advanced Lego sets knows that the worst feeling in the world is getting near the end of an assembly, only to realize that a mistake had been made some pages back. This meant that to fix that issue, you'd have to disassemble the assembly piece by piece until you were back at that step. Unfortunately, being human and all, I of course made such mistakes on a few occasions, but my passion for Legos and the excitement that this build gave me didn't deter or demotivate me from continuing on once I'd realized that a piece had been put on backward 20 steps back.

One Important, and Very Cool Detail:
Probably one of the coolest features of the 911 GT3-RS set was this plate below. The instruction manual highlighted that each set came with this plate, which had its own unique serial number, which gave you access to unique online features, specific to the set you were building. I haven't looked too much into it just yet, but I will and get back to you.

Missing Pieces:
It wasn't until the very last few steps of Box 1 that I had realized that I was missing a piece. Now, most of the time, a missing piece, if it's not critical to the build, won't normally stop progress. However, this piece was important, as it would have to be covered by the assembly of Box 2. Not only that, but the missing piece would link the wheels to the gearbox - what would otherwise be the drive shaft of the real Porsche. That meant, that while I was only steps away from completing the first box, I'd have to hold out until I could obtain a replacement for the missing piece. Luckily, Lego will send you missing pieces for free, however the caveat to that was that delivery would end up taking close to 3 weeks, as I would find out.
My excitement combined with the knowledge that i'd be in for a wait for the missing piece led me to look over the steps for Box 2, which I learned would be the subframe of the car - a section that I also learned could be built separately from the chassis of Box 1. With that, I boxed up the remaining pieces from the first box, opened up the second box, and got to work.
Coming together:
One of the most exciting parts of this build for me was completing the sub frame and attaching it to the chassis to form the underbody of the Porsche. It was at the point I linked the two sections together that the build was finally starting to take shape. Attaching the sub frame to the chassis also gave me my first real impression of just how large this build was going to be when it was finished. At 1/8 scale, it was not really intended to be a desktop model, but rather one that was deserving of its own shelf display space.

It was at this point that I had decided that I would have to wait until the missing piece I mentioned earlier could come in. When I attached the chassis and sub-frame and looked over Box 3, I realized that it would only be more difficult - if not impossible - to access the engine bay and attach the drive shaft piece. With that, I sadly boxed everything up and put the set away until I could continue on - something that might have been considered a blessing in disguise for my girlfriend, whom had been on my case for building for nearly 2 weeks straight. This build was really that addicting.
Carrying On:
Once I'd received the missing piece for the drive shaft on box 1 and put it in, I was able to really get a good look at the mechanical intricacies of the build, and how well put together and thought out everything under the hood was. And while it was fascinating to know that I'd somehow successfully assembled a double clutch gear box and drivetrain, the fact that the sub frame covered up all the gears and working parts made me slightly sad. Nevertheless, I was still full of excitement that I could finally move forward and finish the 911 build. Boxes 3 and 4 weren't as dense as boxes 1 and 2 piece wise, but they were in essence the boxes that really brought the Porsche set together and gave it its final shape.

Notable Challenges:
There were a couple portions of the build that presented unique challenges when translating the steps in the booklet to reality. The first of these was the PDK shift system. With any build, orientation is always important to consider when fitting pieces on, and unfortunately, somewhere about half-way through the process, I'd neglected to check my orientation with that of the book, and found out that I'd mounted the main shift point piece incorrectly. As a result, I had to disassemble the shifter stack about half way to re-fit the piece correctly and mount it properly to the rest of the assembly. Though this was a small portion of the build, it took me nearly an hour to re-fit and re-assemble the PDK stack to get it to fit right. It was quite the headache, but in the end, I survived.

The other issue came toward the end when I was fitting the doors to the body. There were a few mounting points for the door hinge to be connected to, and the angles I had to work with were kind of awkward and even frustrating at times since I had to be careful when bending the pieces in ways so that they wouldn't break or disconnect from the rest of the door assembly.

Finishing up:
With the end of Box 4 in sight, it laid out a bittersweet moment. On one hand, I would be finishing the most advanced and complex lego build i'd ever done, something with excited me greatly. On the other had, i'd be finishing the most advanced and complex Lego build I'd ever done - something that saddened me equally greatly. It's like when you beat a long video game for the first time, or when you arrive to a destination after days of traveling. Sure, you can enjoy it while you're there, but eventually you're just going to have to go back.

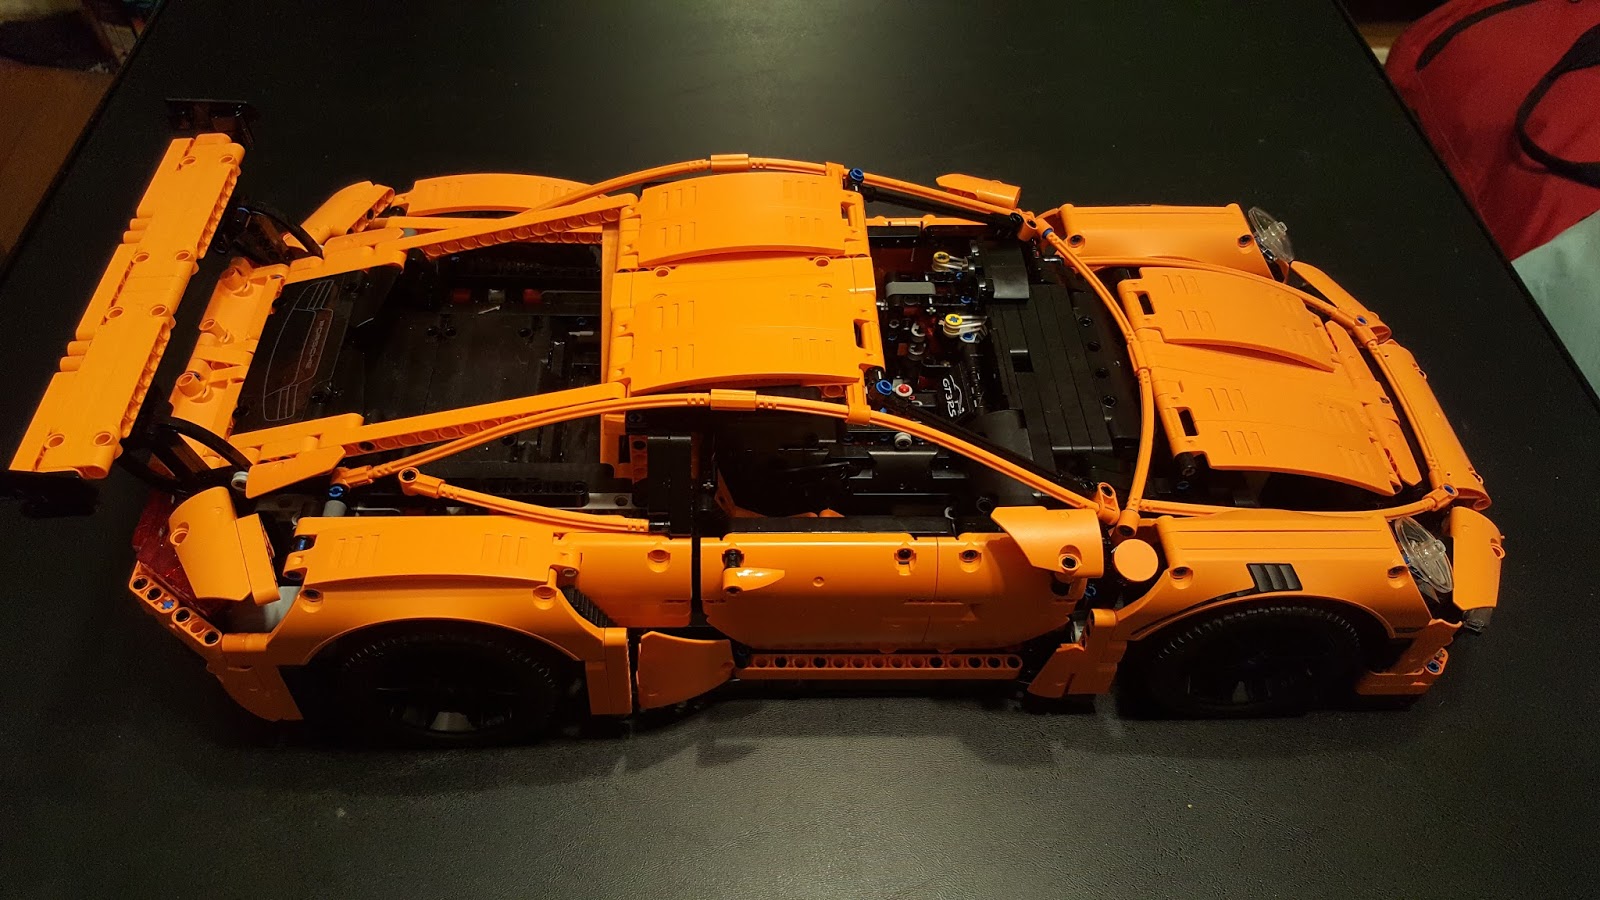
As I assembled the final details of the Porsche - the spoiler, the wheels, and even the small tote that went into the "frunk" of the car, I reflected on the 5 week journey that this build had taken me on. I thought about how my current aesthetic appreciation of cars was joined by a new-found appreciation for the mechanical intricacies that make them great thanks to the time I spent building the diff, gear box, suspension system, and everything else that lived in the underside of the Lego Porsche 911 GT3-RS that made it such an incredible machine.


As I fit the last of the 4 wheels onto the Porsche, the last page of the instruction manual showed the completed model - something that I hadn't normally seen in other builds. But I think it was there to tell me "you've done it. You've gone through this entire book step by step, and look what your efforts have produced". And that was what made that final step a memorable one.
This build was by far and away the most fun I've ever undertaken in my short life, and while the price tag might intimidate you ($329 at the LEGO store), don't be concerned about buyer's remorse, because the build experience itself was worth every single penny.
GALLERY:


No comments:
Post a Comment